Wednesday, September 25, 2013

Small Group Work and a FREEBIE!

Wednesday is always a day the kiddos look forward to because it is Small Groups Day.  Every Wednesday, I group the students and give them a full hour to "play games".  At least, that is how they see it.  Actually, they are working on special skills that need a little tweaking.
This week, I had the groups work on Parts of Speech (Nouns, Verbs, & Adjectives),
Place Value with Horse Race,
Spelling and Phonics skills with Versatiles,
and Computer Skills with ABC Ya!

One of the skills that I discovered very early on in the year that needed A LOT of work was Parts of Speech.  My sweeties really had a tough time naming nouns, verbs and adjectives within sentences.  So I pulled together this activity.

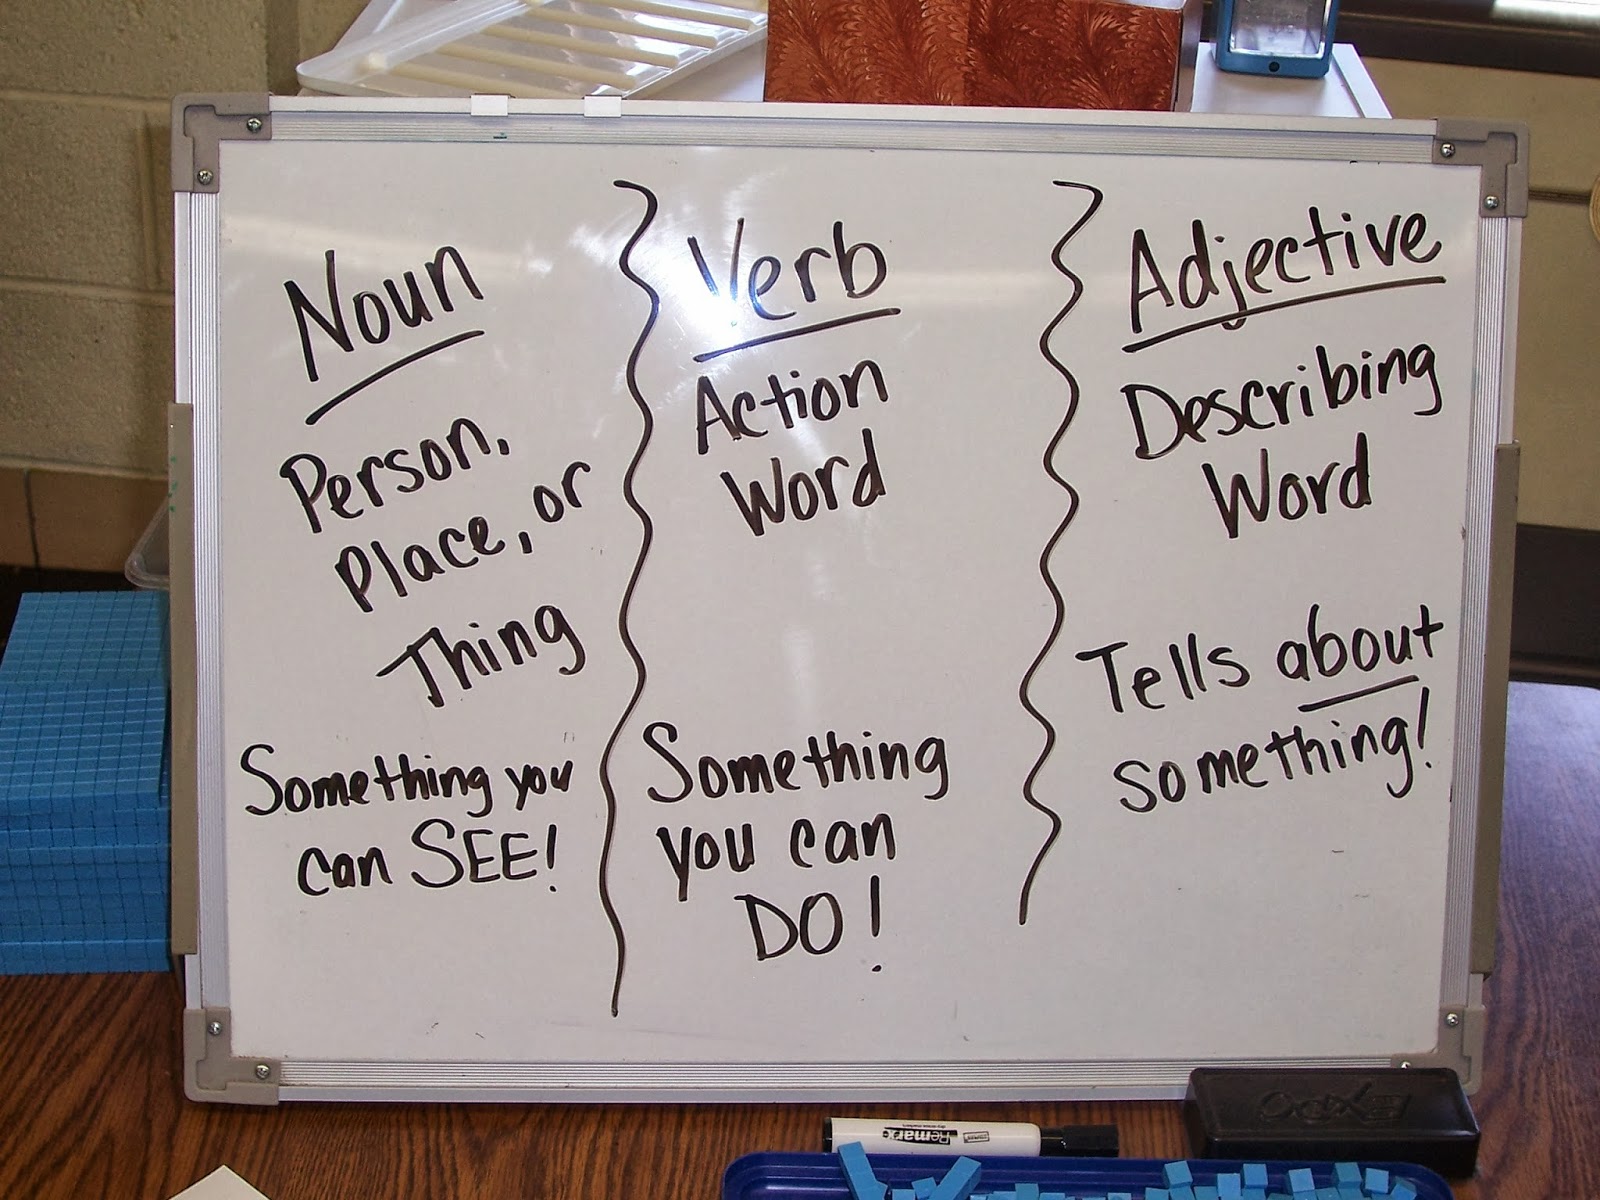
I pulled out my noun, verb, and adjective word tiles that I got from Wal-Mart a million years ago. 

The students were to draw a tile out of the bag and write the word in the correct section on a worksheet. 
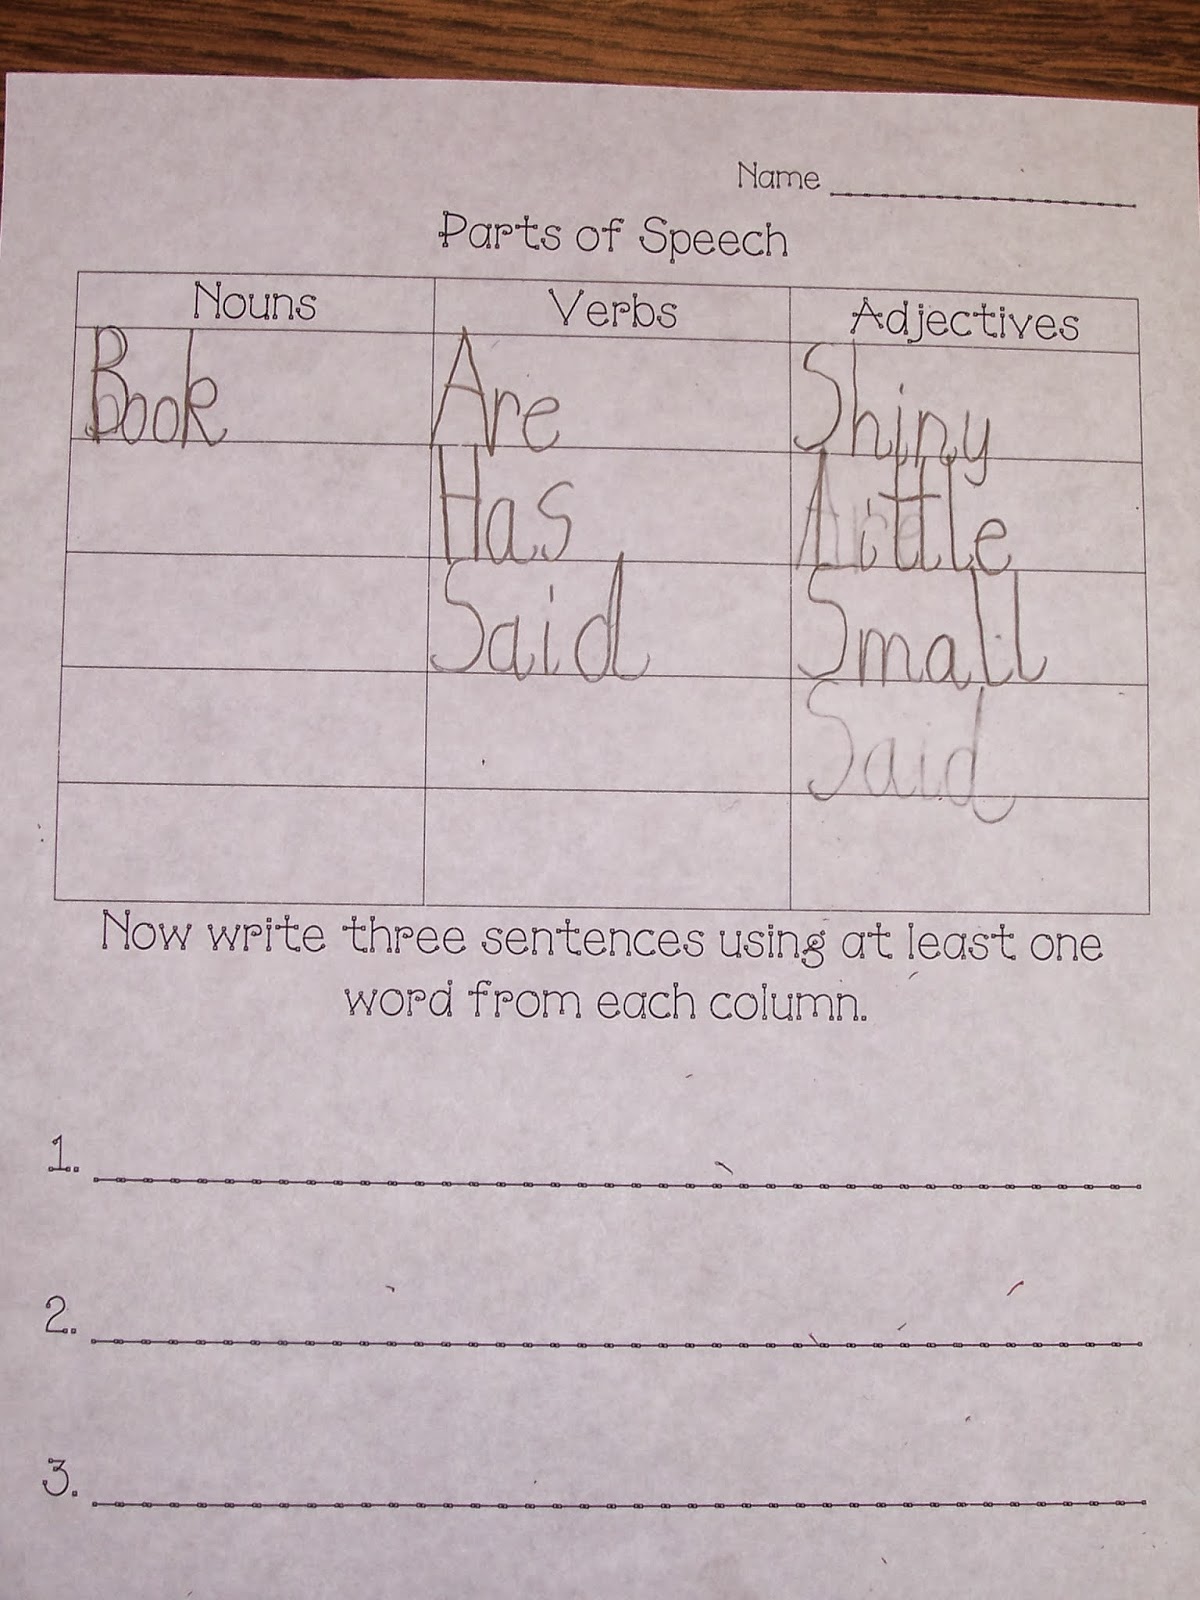
Here is a sample of what the first group had going so far.  


Click the worksheet or here for the FREEBIE!

This shows a group working on Place Value using StrataDice from Box Cars and One-Eyed Jacks.  If you would like to learn how to play the game the kids are playing, you can read a post I did on these last year.

This is a quick pic of a student working with VersaTiles.  I discovered VersaTiles (an ETA product) years ago when I was a tutor for Sylvan Learning Center.  These are a great way for your students to work on important skills without killing a bunch of trees.  I will be doing a post soon on this incredible product and it's uses in the classroom.  
Finally, the babes had a chance to get on the computer and play some learning games through ABC Ya!
This week I let them choose which games to do, but soon I will be giving them direction on what to be working with.

Like I said, we have an hour for these activities, so I usually give the groups 20 minutes to work and then we rotate to the next station.


That's all for now!  Be sure to grab that FREEBIE for your own parts of speech activities!

~Stacy


Thursday, September 12, 2013

Paperless Math Practice

"This is so COOL!"  Those were the words repeated over and over by my studnets when I tried out a new, paperless way to practice their math facts.
 
Yes, ladies and gentlemen, I had my students write on their desks!!!!!!!
I actually found this idea from Pamela over at Teaching 4 Real via Pinterest.
 
 
She was searching for a way to keep her morning kids busy without killing a bunch of trees in the process.  So she introduced the idea of using dry erase markers to write out their multiplication facts directly onto their desks.
 
For me, (and Pamela) this was a HUGE success!  The kids loved bing able to write on their desks because it is usually FORBIDDEN!


The dry erase wiped cleanly off, and as an added measure we all did a quick clean up with a Clorox wipe. 
 
Since my kiddos are struggling with their math facts, this is going to be my quick go-to activity during those "I'm done, now what?" moments. 
 
I also plan to take this further and have the kids practice place value, ( ie. tens and ones, expanded form, written form) weekly spelling words, DOL, word sorts, etc.  This could make a great formative assessment!!!!!!!  The possibilities are endless!
 
~Stacy 

Monday, September 9, 2013

Monday Made It - Expanded Form Cups

 
Today I am linking up with Tara at 4th Grade Frolics for her "Monday Made It" linky. 
 
I am soooo excited to use this with my class this week!
These are a great way to get your kids working with expanded form.  I've see this idea on pinterest but I also spotted some easy to use directions at Sue Downing's TpT store for FREE!
 
The idea is totally simple.  You can make a number from 0 to 99 by turning the cups to line up the numbers.  To expand the number, just slide the outer cup to the right and you have an instant expanded form number sentence.   
 
Below, I show how I made marks onto a third cup so that I could space the numbers evenly around the rim.  Keep that cup (and make a few extras) so you can quickly make a 100's set.     
 
I bought a whole bunch of styrofoam cups this weekend and I plan to have my class make their own set of these. 
 
Now I just need to figure out a way to use this same priciple but use it to create more difficult expanded form number sentences like 30+14.  My kiddos are REALLY struggling with this concept...... gotta love Common Core!
 
So head back to 4th Grade Frolics to link up and share your latest creations!
~Stacy


Thursday, September 5, 2013

The Return of the Quick Tips Linky - Yay!!!

 
I'm linking up with Jean at Diving into 2nd Grade to celebrate the return of her (and Angela's) Classroom Quick Tips Linky.  I loved this linky!  It gave me SO many ideas last year!
 
The quick tip I'm sharing today actually comes from another blogger but I have started using this year and my kids LOVE it!
This baby comes from Leslie at First Grade and Flip Flops.  She came up with a bunch of adorable and catchy attention grabbers.  The cool thing is that you don't have to use the same one all the time.  You can change it up to keep the kids on their toes!
 
So far our favorites are: "All set?  You bet!", "Red Robin . . . Yum!", and "Peanut Butter . . . Jelly Time!" 
 
So here is how I use it:
 
I have four tables in my classroom.  Each table has a bookshelf that holds all of the students' materials.  I posted this "Attention" sign in a sheet protector to the backside of each bookshelf.  If I use a grabber the kids don't know the response to, they just have to look at their own copy.
 
I use sheet protectors in other places in my room so that I can easily change out the paper while still protecting it from the sticky, grubbiness that is elementary school!
 
Here, I'm using it to show the students what level books they can get out of my classroom library.  As the year progresses, the kids move up in level.  So I just need to change the colors, print it out and stick it into the protector.
 
So head on back to Diving into 2nd Grade and link up!  I can't wait to steal borrow so great new classroom tips!
 
 
~Stacy


Wednesday, August 28, 2013

Is It August (Almost September) Already?!?!?!

I am a terrible blogger.  I have completely neglected my blog ALL summer.  It was a busy one, though.  And it went by way too fast! 
 
Well, to get back into the swing of things, I figured I should share my new classroom color scheme and table arrangements.  Last year I wrote a post about my messy and non-color-coordinated classroom. You can see the plans and before pics here.
And BEHOLD, the after! 

 New tables (-ish, these were found lurking in an unused classroom), decor, even new curtains! 
 
I have a TINY class this year (only 13 students!!  I know, right?) so changing over to tables will probably be an easier adjustment.  I hope.  I have four tables and each table holds up to 7 students but I pray I will never have a class of 28!  Right now I have two groups of 4 and one group of 5.  But I can tell you, after less than 2 weeks in session and that table of 5 is becoming a chatter box!
 
 
Here is a close-up of the book shelf I have set at each table.  It is the perfect size to hold all of their supplies but not so much in the perfect color.  I am regretting ordering the white.  It is already showing an incredible amout of dirt and grime.  I hope to keep it at bay with Clorox wipes and diligent handwashing.  We'll see.  I'll probably just end up painting them black for next year.  Each shelf has several bins to keep all of their smaller supplies.  I either got the boxes from Dollar Tree or from walmart.com.
 
 
I even gave each table their very own pencil sharpener.  This has completely changed our pencil-sharpening routine.  Even though my class is small, the line for the sharpener is NON-EXISTENT!  But the kids always have a sharpened pencil, ready to go.  It takes no time at all to get this little chore done each morning.  Of course, the sharpeners came from Classroom Friendly Supplies.  I even got my principal to order the 36 pack for our WHOLE school.  Everyone loves these. 
 
I also built (well, actually, my father and husband did) this really cool sofa table to hold all of my "stuff" up by my desk.  I got the plans here.
 
It's virtually empty now, but I sure I find something to fill it up with!
 
Here are a few of my new bulletin boards, too.  I plan to keep the black paper and crumple border all year but change out the sayings at least once a quarter. 
 
This board shows the writing we did on the first day of school.  I gave each student a small can of playdough and told them to sculpt something from their summer.  It could have been a trip they took, a ride they went on at the fair, something they saw, etc.  After they finished their sculpture, they wrote about it.  Most of the class was able to fill the entire sheet of paper!  That's pretty impressive for the first day!
 
This board is another steal from pinterest.  To engage those Higher Order Thinking Skills (HOTS), students are given an answer and they need to think of a question that would result in that answer.  For the most part, the class stuck with addition and subtraction sentences, but I tried to get them thinking about other subjects: "How many planets are there?" or "How many boys are in our class?"
I plan to change the answer each week and give the class time to come up with their own questions.
 
And finally, here are some anchor charts the class and I made the first few days of school to remind them about what each of us needs to do to have a good year and what reading LOOKS like.  Of course, I totally stole these ideas from pinterest.
 
 
So that's all for now!  Hopefully, I can get back into a posting routine!
 
~Stacy


Friday, May 24, 2013

A (late) Tried-It-Tuesday {FREEBIE} and Classroom Quick Tip Linky Combo!


Today I am doing a double-linky.  First, I am linking up with Holly at Fourth Grade Flipper for her weekly "Tried-It-Tuesday".  With the school days winding down, I am always on the lookout for quick but engaging activities.  I found this great FREEBIE by RaRaDT on nouns, verbs and adjectives. 

 
This quickie, but goodie has the kids making a flip book and thinking of their own nouns, verbs, and adjectives.  I extended the activity by having the kids write short stories about the different locations, making sure to use the words they came up with in the story they write.
 
 
Here are a few shots of how the different students sorted their words for the flipbook.


Now for the second link-up today.  I am linking up with Jean over at Diving Into 2nd Grade for her new Quick Tips Linky.  This is just a great idea.  Obviously, we bloggers are happy to share the great activities we create in our rooms.  But these simple tips and tricks are what really make a classroom tick.
 
This is my "I'm Busy . . ." light. 
 I got this push light from Dollar Tree {a teacher's BEST friend} and then wrote on the face with a Sharpie.  

Tell me if this sounds familiar:  You are helping a student with a question at your desk.  Other students begin to wander up and get in line to ask their own question.  Pretty soon, half the class is at your desk getting chatty and disruptive, not getting ANY work done. 
Oh, yeah.  I think we've ALL been there.
 
So begins the reign of my "I'm Busy . . ." light.
I keep this light at my desk.  Whenever a student comes to ask me a question and it seems the answer may take longer than just a few seconds, I push this baby on.  My other students know that when this light is on, they may not come up to my desk at the moment.  Whatever question they have can wait, and they are to contiue working on the rest of the page.  When the light goes off, they can come up for their turn.
 
It has made a big difference in the disruptions in the room during work time and I've noticed I have more patience for the next student because I didn't spend my time shushing the other kids in line. 
 
~Stacy 


Wednesday, May 22, 2013

Horse Races & Animal Teeth!

It must seem like I'm a walking, talking billboard for Boxcars and One-Eyed Jacks!  Once again, I'm posting about another of their WONDERFUL products.
 
These are their Stratedice.  There is a wealth of games you can play using these babies.  Today I had my class using them to practice place value to hundreds and multiplication. 
 
Horse Race
Here's how you play:  Pair your students and give them one tray.  The kids CAREFULLY empy both trays and divide the dice by color.  This game is played like War.  Each student takes two dice and rolls them.  If you are playing Place Value, they arrange the dice into tens and ones.  The student with the biggest (or smallest if you choose) wins that round.  The winning dice go onto the Race Track (the black tray) and the losing dice go to the Barn (the clear tray).
 
The important thing to remember here, is that the students must learn to verbalize WHY they won. 
For example, the white dice has the number 651.  The blue has 411.  The white dice wins because "6 hundreds are greater than 4 hundreds."
 
 
After a few rounds of playing Place Value Horse Race, I had them work on Multiplication.  Here the kids roll two dice and find the product of the two numbers.  The student with the highest number wins.  Remember, they need to verbalize why they win!
 
Since I'm talking about multiplication, I just HAD to share something that I discovered a couple years ago and have used it to help my students remember their multiplication facts. 
 
It is called Memorize in Minutes: The Times Tables.  It was written by Alan Walker.  It doesn't have a cutsy cover, so I just made one.  What the author has done is come up with short stories to go along with each fact and it creates a memory hook.  Each number is given an image and those images and words are used in the story.  Here's one of my favorites:
 
"One evening there was a party for a queen at a big hotel.  The hotel had revolving doors.  When the queen got to the hotel, she was amazed to see the revolving doors.  She had never seen doors like those before.  She pushed the doors and went around and around because it was so much fun.  Soon she became dizzy and felt sick.  She had become a sick queen."
 
The greatest thing about this is that it's completly FREE!  Get your own copy right here.
 
Animal Teeth!
I was so excited to try this activity that was created by Yolanda Arnold over at Oceans of First Grade Fun
 
 I had recently gotten a copy of "What If You Had Animal Teeth" from my Scholastic book order and then came across Ms. Arnold's post.  I thought this would be a great project to do in our final days of school. (Only 3 more days for us!!!!!!)
 
My kids had so much fun doing this activity and their projects came out AWESOME!
Here is a Vampire Bat and Rattlesnake.

Here is a Beaver and a Crocodile.
This is certainly going to become a regular project in my classroom!
 
~Stacy


Tuesday, May 14, 2013

Making Words & Sammies! {Freebie!!!}


With the school days winding down, the kids are getting antsy.  So when that happens, I pull out the Box Cars activities.  Today's fun is called "Word Shapes".  This game has the students rolling letters and trying to build words.  But they need to be strategic!  The slots are shaped for tall, small, and fall letters and the student must think about words they know and if certain consonants can be found at the beginning or the end.  Middle slots should be saved for vowels . . . but not always.

First the students are divided into pairs and given a 30-sided dice with vowels, consonants and four wilds.  We got ours from BoxCars and One-Eyed Jacks but you could also have the kids pull letters from a bag. 

The students take turns rolling (or pulling) and write a letter in the appropriate box, depending on the shape.  Once a letter is placed, it cannot be moved.  The first student to make 3 words, WINS! 


Here's the FREEBIE!

Click on the image below for your very own set of this game.  Just in case you can't get your hands on the 30-sided dice, I also included a set of letter and word cards.  You may want to make the consonants blue, the vowels red, and the wilds green.  I copied the Word Shapes sheet out on colorful paper and laminated.  The students use a dry-erase marker to complete the activity.


And last week, I finally decided how I wanted to use the Sandwich Coasters I found at Dollar Tree (thanks to Krista at The Creative Chalkboard).  I used Avery labels to give each ingredient a money value.  I kept the amounts easy to calculate, for now.
Bread:  25 cents
Ham:  75 cents
Bacon:  75 cents
Swiss Cheese:  50 cents
Cheddar Cheese:  50 cents
Lettuce: 50 cents
Onion:  25 cents
Tomato: 50 cents 

I partnered the class up and gave them a dry-erase board and a set of ingredients and told them they would be working in a sandwich shop today.  To take the sandwich shop idea even further, you may want to provide aprons and food-prep gloves for the class as they make the sandwich!
The rest is simple.  Give the class an "order".  They need to make the sandwich and calculate how much it will be.  Here are a few shots of what my kids were doing to figure out how much each sandwich would cost.


I just LOVED how this group combined prices to make a $1.00 to make adding everything else up easier.

After the kids get comfortable, you could tell them that the customer only has a certain amount of money to spend.  Their job is to come up with sandwich combinations that total that amount. 

That's all for now!

~Stacy